
Install Kali Linux ARM on Raspberry Pi

Before we begin, let me give you a brief introduction on Raspberry Pi. Well, a Raspberry Pi is a low budget, small credit-card sized ARM board, that acts as a computer. This board is developed by Raspberry Pi Foundation, UK with the intention of promoting the teaching of basic computer science in schools. The processor at the heart of the Raspberry Pi system is a Broadcom BCM2835 system-on-chip (SoC) multimedia processor. This means that the vast majority of the system’s components, including its central and graphics processing units along with the audio and communications hardware, are built onto that single component hidden beneath the 256 MB memory chip at the centre of the board. It’s not just this SoC design that makes the BCM2835 different to the processor found in your desktop or laptop, however. It also uses a different instruction set architecture (ISA), known as ARM. The ARM-based BCM2835 is the secret of how the Raspberry Pi is able to operate on just the 5V 1A power supply provided by the onboard micro-USB port. It’s also the reason why you won’t find any heat-sinks on the device: the chip’s low power draw directly translates into very little waste heat, even during complicated processing tasks.
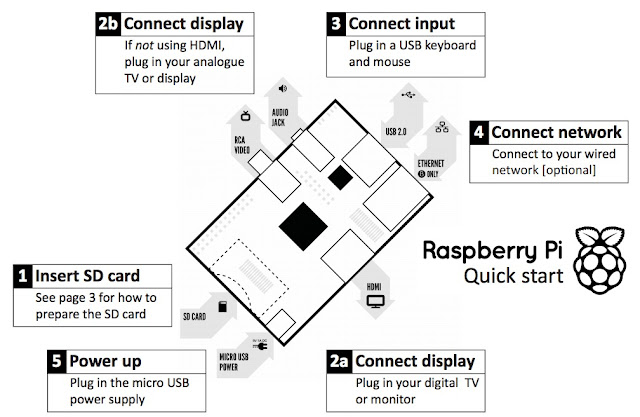
Figure(1). Sketch of a Raspberry Pi Board

    Figure(2). Actual view of a Raspberry Pi Board

Figure(3). Raspberry Pi Board in a box

Figure(4). Raspberry Pi Board to work as a computer


Components needed to make Raspberry Pi to a Computer are:

• Raspberry Pi board
• Micro USB lead (for power)
• USB power adapter (also for power)
• HDMI lead: Type A to Type A (to connect to your monitor or TV)
• HDMI display
• SD card: 2 GB to 64 GB (for storage); 8 GB minimum recommended
• SD card reader
• USB keyboard and mouse

Now, let's get started installing Kali Linux for Raspberry Pi.

1. Download Kali Linux for Raspberry Pi image.
2. Use dd utility to image this file to your SD card. Assumed that the storage device is located at /dev/sdb. Please note that this process will wipe out your SD card. If you choose the wrong storage device, you may wipe out your computers hard disk.

root@kali:~ dd if=kali-pi.img of=/dev/sdb bs=512k

This process can take a while depending on your USB storage device speed and image size. Once the dd operation is complete, boot up your Rasberry Pi with the SD card plugged in. You will be able to log in to Kali (root / toor) and startx.

Comments

Popular posts from this blog

Upcoming Book- Kali Linux Revealed: Mastering the Penetration Testing Distribution

More exciting news! In the past year, Kali Linux Official Team has been working internally on an Official Kali Linux book – Kali Linux Revealed: Mastering the Penetration Testing Distribution . This is the first official Kali book from Offsec Press , and is scheduled for release on June 5th, 2017 . Kali Linux Revealed will be available in both hard copy and online formats. Keeping the Kali Linux spirit, the online version of the book will be free of charge, allowing anyone who wishes to hone their skills and improve their knowledge of Kali to do so at no cost. This book, together with our official Kali documentation site will encompass the body of knowledge for the Kali Linux Certified Professional   (KLCP) .

Kali Linux: A complete InfoSec Distro

BackTrack has always been a popular choice when it comes to security and penetration testing. This open source distro has gained a lot of popularity and was rolled till version 5 with frequent changes to the variants. This project from Offensive Security has been moved from Ubuntu to Debian and the operating system is now renamed as Kali Linux. If you have installed a fresh copy of Kali Linux, then you might have noticed some awesome security and penetration tools under Kali Linux drop down menu list. These tools are powerful and yet efficient to use. If you go through the menu list of security tools, you might have noticed that few like Wireless Attacks, Forensics and Reverse Engineering is added, which is quite impressive. One more section has been added in the list, ie Hardware Hacking. One more thing that you would be happy to see is Arduino kit on the list. Arduino is a single-board microcontroller designed to make the process of using electronics in multi-disciplinary projects mo...

Wordpress hacking - How to install / run wpscan on windows xp / windows 7 / windows 10

HOW TO RUN WPSCAN ON WINDOWS Byrockstardevil Requirements: rubyinstaller Development Kit for rubyinstaller curl DLL for windows : libcurl.dll 1 - install rubyinstaller you must have Ruby 2.2.3 version . download links here : http://rubyinstaller.org/downloads/ for more info : https://github.com/oneclick/rubyinstaller/wiki 2 - install Development Kit for rubyinstaller download link : http://rubyinstaller.org/downloads/ how to install : https://github.com/oneclick/rubyinstaller/wiki/Development-Kit if you face that problem  "unknown encoding name -  (ArgumentError)" just type "chcp 1252" in cmd and hit enter 3 - install libcurl.dll A - Download libcurl.dll from : http://www.confusedbycode.com/curl/ B - copy libcurl.dll copy  libcurl.dll into ruby bin folder or wpscan folder and make sure to add it to your PATH. I also added .DLL to PATHEXT ex : C:\Ruby21-x64\bin\ you can visit : http://www.computerhope.com/issues/ch000549.htm to know to set the p...