
Steganography: Steps to Hide data behind Image


I wonder if you have ever faced situation when you need some important files of yours to be known only to you without ever having any sign that you are hiding something. You may have faced a creepy situation when you are hiding your personal diary in your computer and just everybody in your house wants to see it or you want to send your friends a hidden message. If you have ever faced such a situation, then let me tell you about Steganography.

Big Name, isn’t it? But actually it is much simple.  Steganography is the practice of concealing a file, message, image, or video within another file, message, image, or video.

You may wonder why to use Steganography if you have various Encryption Technology that may better handle your privacy. Answer is simple, Plainly visible encrypted messages—no matter how unbreakable—arouse interest, and may in themselves be incriminating in countries where encryption is illegal. Thus, whereas cryptography is the practice of protecting the contents of a message alone, Steganography is concerned with concealing the fact that a secret message is being sent, as well as concealing the contents of the message.

In this article,we will discuss the steps to Hide data behind Image. Follow the steps carefully and you can easily hide any data you want.

How to Hide data behind Image:

In this post I would tell you about a simple Steganography which all of you can do with simple command.exe in your windows . All you need is WinRar, little knowledge of command prompt and a picture file. (You may take a selfie for this).

Don’t worry if  you do not know about command prompt, I would be guiding you:

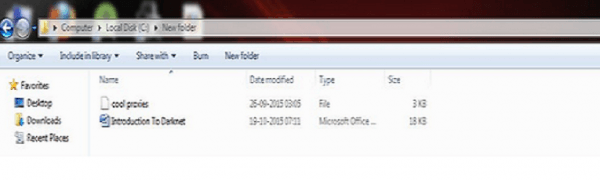
Step 1. Gather all the files that you wish to hide in a folder anywhere in you PC.

FOR EXAMPLE: I am hiding two files in C:\New Folder

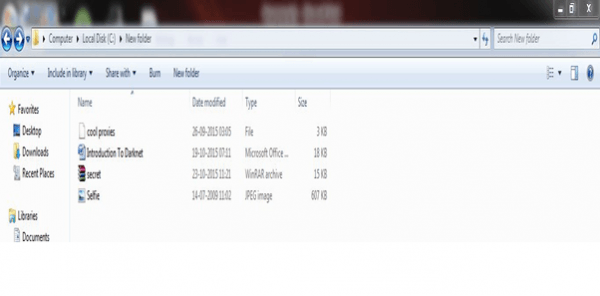
Step 2: Now, add those files in a RAR archive(e.g. secret.rar) using the WinRar software. This file should be in the same directory (C:\New Folder).

Step 3: Now copy that picture file in C:\New Folder.

Step 4: Now open Command Prompt. (Go to Run and type cmd).

Navigate to C:/New Folder using “cd” command.
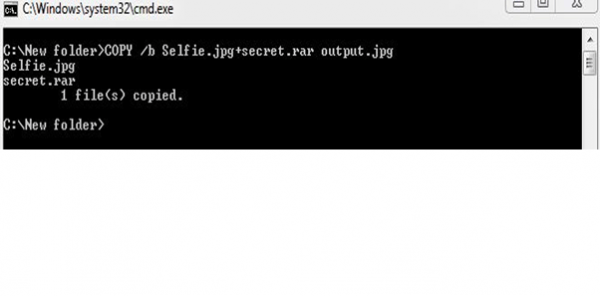
Now type:

COPY /b Selfie.jpg+secret.rar output.jpg

(output.jpg would be containing hidden data).

Voila, your files are hidden.

Step 5: Delete all files except output.jpg.

If you would try to open output.jpg it would be a simple picture file. But if you would open output.jpg with WinRar Software… You would see your beloved files well hidden behind image file.

Now you can give your selfie to your Crush with a love letter hidden behind it…

My whole life, I was wandering about such tricks we used to see in Movies. Now we all can do such tricks within Minutes. Isn’t it too  easy to Hide data between Image. We hope that you have successfully completed this tutorial Titled: “How to Hide data behind Image”. If you are still facing any problems in any step, then fell free to comment below.

Comments

Popular posts from this blog

Wordpress hacking - How to install / run wpscan on windows xp / windows 7 / windows 10

HOW TO RUN WPSCAN ON WINDOWS Byrockstardevil Requirements: rubyinstaller Development Kit for rubyinstaller curl DLL for windows : libcurl.dll 1 - install rubyinstaller you must have Ruby 2.2.3 version . download links here : http://rubyinstaller.org/downloads/ for more info : https://github.com/oneclick/rubyinstaller/wiki 2 - install Development Kit for rubyinstaller download link : http://rubyinstaller.org/downloads/ how to install : https://github.com/oneclick/rubyinstaller/wiki/Development-Kit if you face that problem  "unknown encoding name -  (ArgumentError)" just type "chcp 1252" in cmd and hit enter 3 - install libcurl.dll A - Download libcurl.dll from : http://www.confusedbycode.com/curl/ B - copy libcurl.dll copy  libcurl.dll into ruby bin folder or wpscan folder and make sure to add it to your PATH. I also added .DLL to PATHEXT ex : C:\Ruby21-x64\bin\ you can visit : http://www.computerhope.com/issues/ch000549.htm to know to set the p

How To Generate Random IP Address Using JAVA ?

Today I'll Show You How To Generate Random IP Address... But First Why I Want This...Right...? Ans : If You Want Test Your Code That Whether It Is Recognizing The Machine By It’s IP Address Then You Had To Use This Code To Generate Random IP Address. So Here We Goooo.... private String generateIPAddress ( int p1 , int p2 , int p3 ) { StringBuilder sb = null ; Random r1 = new Random (); Random r2 = new Random (); Random r3 = new Random (); Random r4 = new Random (); String ip1 = Integer . toString ( b1 ); String ip2 = Integer . toString ( b2 ); String ip3 = Integer . toString ( b3 ); String ip4 = Integer . toString ( b4 ); String b1 = IpConverter . longToIp ( r1 . nextLong ()); String b2 = IpConverter . longToIp ( r2 . nextLong ()); String b3 = IpConverter . longToIp ( r3 . nextLong ()); String b4 = IpConverter . longToIp ( r4 . nextLong ()); //Now the I

3 Ways to Root Android 7.0 Nougat on Nexus Running Official AOSP [Update: Root Android 7.1]

3 Ways to Root Android 7.0 Nougat on Nexus Running Official AOSP [Update: Root Android 7.1] If you own a Nexus phone then chances are you have already updated your device with the latest official Android 7.0 Nougat firmware. This brings the newer firmware build number NRD90M to the Nexus range including the Nexus 5X, 6P, 9, 6, Nexus Player, and the Pixel C. Unfortunately, Nexus 5 and 7 were left behind. This has been a game-changing week for the Android community as you can now expect the new software for your Android device soon enough. It may either come officially from a manufacturer or unofficially from developers like CyanogenMod. Just like we saw the unofficial support for the  Nexus 5 and the Nexus 7  today. As the new AOSP source code is now available to developers, soon you may find Cyanogen 14 based custom ROMS releasing for several devices. Hence, to be ready, you may need to be rooted and also setup a custom recovery like TWRP on your device. So that once the CM 14 bas