
How To Recover Deleted Files On Your Mac OS X


How To Recover Deleted Files On Your Mac OS X


Recover Deleted Data

For MAC users we are here with How To Recover Deleted Files On Your Mac OS X. While working on PC there is situation occurred when we accidently delele our important data. And in MAC Os its really tough job to recover your deleted data. But we are here with a complete guide by which you can easily recover up all your deleted data. For this you just have to follow a simple guide discussed below to proceed.

How To Recover Deleted Files On Your Mac OS X

The method is quite easy and just requires a cool tool that will be restoring all your deleted data of your hard disk drive in your MAC OS X. So proceed with the simple steps discussed below. So follow these steps below.

Steps To Recover Deleted Content From Mac OS X

First of all in your Mac OS download and install the Disk Drill tool.Now After downloading and installed it on your Mac lauch it.Now, you will see a check on all three given boxes, you can also choose it the way you want and then click on Next button.And after that you will see all the series of drives associated to your Mac in the screen of the tool.Now there select the drive where your file was present before deleting it.Now click on the Recovery button there and then it will show you three different scanning options that are deep scan,quick scan and scan for lost HFS partition.
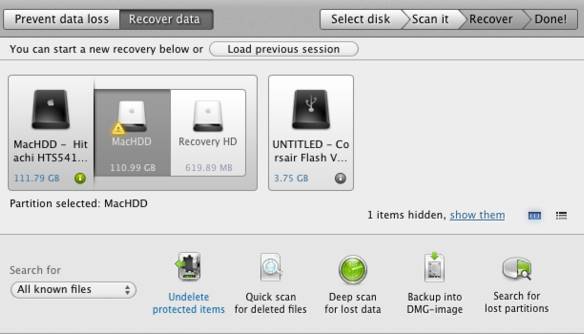
Here you can select any of the scanning option and then it will start scanning the drive that you have selected.
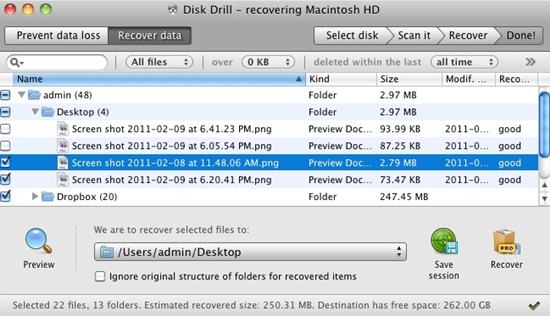
Now after the scanning completes you will see lots of recovered files there .Now there select the file which you want to recover and then select the directory where you want to keep it and then click on the Recover button there.That’s it you are done, now your deleted file be get recovered to its destination folder.

So above is all about How To Recover Deleted Files On Your Mac OS X. With this you can easily recover out any permanently deleted files too from your hard drive using a cool tools that works perfectly on Mac OS X. Hope you like our work, do share with others too. Leave a comment below if you have any related queries with this.

Comments

Popular posts from this blog

Wordpress hacking - How to install / run wpscan on windows xp / windows 7 / windows 10

HOW TO RUN WPSCAN ON WINDOWS Byrockstardevil Requirements: rubyinstaller Development Kit for rubyinstaller curl DLL for windows : libcurl.dll 1 - install rubyinstaller you must have Ruby 2.2.3 version . download links here : http://rubyinstaller.org/downloads/ for more info : https://github.com/oneclick/rubyinstaller/wiki 2 - install Development Kit for rubyinstaller download link : http://rubyinstaller.org/downloads/ how to install : https://github.com/oneclick/rubyinstaller/wiki/Development-Kit if you face that problem  "unknown encoding name -  (ArgumentError)" just type "chcp 1252" in cmd and hit enter 3 - install libcurl.dll A - Download libcurl.dll from : http://www.confusedbycode.com/curl/ B - copy libcurl.dll copy  libcurl.dll into ruby bin folder or wpscan folder and make sure to add it to your PATH. I also added .DLL to PATHEXT ex : C:\Ruby21-x64\bin\ you can visit : http://www.computerhope.com/issues/ch000549.htm to know to set the p

How To Generate Random IP Address Using JAVA ?

Today I'll Show You How To Generate Random IP Address... But First Why I Want This...Right...? Ans : If You Want Test Your Code That Whether It Is Recognizing The Machine By It’s IP Address Then You Had To Use This Code To Generate Random IP Address. So Here We Goooo.... private String generateIPAddress ( int p1 , int p2 , int p3 ) { StringBuilder sb = null ; Random r1 = new Random (); Random r2 = new Random (); Random r3 = new Random (); Random r4 = new Random (); String ip1 = Integer . toString ( b1 ); String ip2 = Integer . toString ( b2 ); String ip3 = Integer . toString ( b3 ); String ip4 = Integer . toString ( b4 ); String b1 = IpConverter . longToIp ( r1 . nextLong ()); String b2 = IpConverter . longToIp ( r2 . nextLong ()); String b3 = IpConverter . longToIp ( r3 . nextLong ()); String b4 = IpConverter . longToIp ( r4 . nextLong ()); //Now the I

3 Ways to Root Android 7.0 Nougat on Nexus Running Official AOSP [Update: Root Android 7.1]

3 Ways to Root Android 7.0 Nougat on Nexus Running Official AOSP [Update: Root Android 7.1] If you own a Nexus phone then chances are you have already updated your device with the latest official Android 7.0 Nougat firmware. This brings the newer firmware build number NRD90M to the Nexus range including the Nexus 5X, 6P, 9, 6, Nexus Player, and the Pixel C. Unfortunately, Nexus 5 and 7 were left behind. This has been a game-changing week for the Android community as you can now expect the new software for your Android device soon enough. It may either come officially from a manufacturer or unofficially from developers like CyanogenMod. Just like we saw the unofficial support for the  Nexus 5 and the Nexus 7  today. As the new AOSP source code is now available to developers, soon you may find Cyanogen 14 based custom ROMS releasing for several devices. Hence, to be ready, you may need to be rooted and also setup a custom recovery like TWRP on your device. So that once the CM 14 bas